Overview
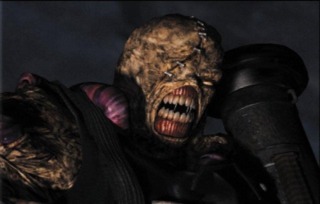 The titular antagonist, Nemesis
Taking place once again in the zombie infested town of Raccoon City, Resident Evil 3 follows Jill Valentine as she tries to escape the oncoming hordes of undead monsters. The game begins one day before the events of Resident Evil 2, eventually surpassing them and extending into the day after.
This time the player finds themselves traversing a substantial portion of Raccoon City itself while also taking a few short trips to locales made famous from RE2, such as the R.P.D. (Raccoon Police Station). Throughout the game, Jill is hunted by the Umbrella corporation's latest B.O.W., and title character, Nemesis. Similarly to the T-103 in RE2, the Nemesis will appear at scripted occasions during the story and will relentlessly try to kill Jill Valentine. Unlike the T-103, Nemesis can follow Jill through rooms and sometimes even comes equipped with his own unique Rocket Launcher.
Gameplay
Overview & Controls
 Jill at the hands of Nemesis
Resident Evil 3 largely plays much like its predecessors Resident Evil and Resident Evil 2, and is split between a mixture of combating B.O.W.s, exploration and puzzles. Fitted with the notorious 'tank controls' the series became known for, players move via a third person perspective throughout a number of pre-determined camera angles.
Players are also forced to stay stuck on the spot when attempting to use their weapons, though auto-aim is turned on by default, so the character will at least aim automatically at whichever enemy is closest -- even if it's located outside of the player's own perspective. Climbing up/down stairs is now performed manually, allowing the player and even zombies to walk up/down staircases at their own pace. Furthermore, Resident Evil 3 is the first to include the 180 degree turn, which allows the player character to instantaneously turn around by simultaneously pressing down and the 'run' button.
Another new mechanic is that of a dodge maneuver. By hitting the R1 or R2 buttons (Default PS1 controls), or by holding the R1 or R2 button then hitting the X button right before an attack, Jill will dodge out of the way. If the character is equipped with a pistol and should also escape via a roll, Jill will go onto one knee which'll give her a temporary boost to her fire-rate with her handgun. However whichever dodge animation the character would use is random.
There exists some destructible objects throughout the game which can help the player in fending off enemies. Such examples include explosive barrels or a loose crane box.

The story is largely portrayed via cutscenes, both in-game and CG, however there are also a number of Files (diaries, memos ect.) players can collect. These will often provide additional insight into the goings on across the overall narrative, but some are more vital as they will provide information pertaining to solving puzzles or maybe hinting as to where to go next.
Encountering differing enemies across multiple playthroughs was introduced in Resident Evil 3 to add a sense of unpredictability. Where a player may have faced a pack of zombie hounds in a particular area, during another playthrough may then find a group of Beta Hunters there instead. A select few encounters with Nemesis are randomized as well.
Playable Characters
Resident Evil 3 only stars one selectable character, being Jill Valentine. Though there will also be a short portion of the story where players will temporarily take control of UBCS soldier, Carlos Oliveira. Carlos functions exactly like Jill, though he does have at least one unique weapon that Jill cannot collect -- two if playing on Hard mode, being his SIGPRO handgun and M4A1 assault rifle.
On one specific occasion when fighting Nemesis in either a restaurant or News Office, Carlos may provide assistance as a friendly NPC. He will use his M4A1 assault rifle, but only on its Manual mode setting, giving it a three-shot burst fire. Carlos can also die during this fight, which will result in a game over, however he is significantly more durable than the player during this fight.
While not playable from a story context, fellow UBCS soldiers Mikhail Victor and Nicholai Ginovaef are playable in the unlockable Mercenaries: Operation Mad Jackal minigame, as detailed further below.
Difficulty
Like Resident Evil 2, Resident Evil 3 offers up two distinct difficulty settings, 'Easy' and 'Hard', with no in-between. The differences are significantly more drastic than between the 'Rookie' and 'Normal' modes in RE2, however. In Easy mode, players start off with an M4A1 Assault Rifle (which is otherwise inaccessible besides as an unlockable in Hard mode), and located within the first inventory box players find in the Warehouse save room is a hefty selection of the game's weaponry, with a large portion of spare ammunition to go along with them. The player's default inventory is also increased from the eight slots in Hard mode to ten (eventually maximising at twelve during the story), which functions across both the main game and the unlockable Mercenaries minigame.
When playing on Easy Mode, however, players cannot acquire the Nemesis briefcase awards for beating him, and the Mine Thrower weapon is removed entirely.
Inventory
Inventory screen, with the character's health up top.All characters across the game feature the same inventory space of either eight slots or ten, depending on the difficulty as mentioned above. Besides the character's inventory, there also exist a number of item boxes where players can store unwanted items. Item boxes are often located within save rooms (though not always) and items will persist throughout all item boxes across the game.
When switching between playing as Jill and Carlos in the story, the item boxes will not carry over any items.
Health
A character's health can be seen via the inventory menu, with an Electrocardiograph Machine showing a character's status. The different statuses are:
- Fine (green) - The character is in good health.
- Caution (yellow) - The character is roughly at half health.
- Caution (orange) - The character is roughly at a quarter of health.
- Danger (red) - The character is approaching death.
- Poison (purple) - The character is poisoned and their health will slowly deplete.
Besides the EKG, players may also note the character's stance. If a character is in the Caution zone, they'll hold their chest, but move at the same speed as if they were perfectly fine. On the other hand if they're in the Danger zone they'll hold their chest and limp, moving incredibly slower than before.
Carrying on the tradition set by the original Resident Evil, characters use a small variety of herbs to heal themselves and cure poisons. First Aid Sprays are also available, with the singular purpose of healing the character fully. There exist three types of herbs, all of which can be combined in some way for different degrees of healing:
- Green Herb - On its own will restore 25% of health.
- Blue Herb - On its own will cure poison, though will no restore any health.
- Red Herb - On its own can do nothing.
- Green + Green Herb - Mixed will now heal roughly 50% of health.
- Green + Green + Green Herb - Mixed will heal the character completely, though not of any poisons.
- Green + Blue Herb - Mixed will heal the character 25% and cure any poison.
- Green + Green + Blue Herb - Mixed will heal the character 50% and cure any poison.
- Green + Red Herb - Mixed will heal the character completely, though not of any poisons.
- Green + Red + Blue Herb - Mixed will heal the character completely, including Poisons.
- Red + Blue Herb - Mixed will do nothing.
Live Selection Choices
During key moments in the game, Jill will be faced with a ''Live Selection''. These sequences temporarily stall the action and allow the player to decide how they'd like to react to a situation from two possible choices. More often than not these are based around Nemesis encounters. As time still progresses, albeit slowly, in these instances, the player is faced with the added pressure of a timer. If the player doesn't choose quickly enough, a decision will be made for them -- usually inflicting damage upon Jill in the process.
A more detailed listing of the choices and their effects can be found further below.
Ammo Crafting
Gunpowder can now be collected in order for Jill to create her own ammo. This allows for the creation of different types of ammo that would not be available otherwise.
There are three individual types of gunpowder in Resident Evil 3; types A and B are found throughout the game and the only way obtain type C is by combining one pot of type A and B. By combining these gun powders with either the Reloading tool or standard grenade rounds, various types of ammunition can be created.
By combining the same kind of gun powder repeatedly with the Reloading tool you can create advanced ammo types for the handgun and shotgun. The number of pots used in a single combination will not affect the progression for obtaining the enhanced ammo, so in order to obtain them as quickly as possible it is best to use a single pot each time.
Below is a complete breakdown for combining every type of gun powder combination with both the Reloading Tool and Grenade Rounds as well as how many combinations is necessary to unlock the enhanced ammo. Difficulty will only affect the amount of ammo created, it does not have any effect on obtaining the upgraded ammo.
Basic Ammo
Bases Results for Mixing with the Reloading tool
- Gun Powder A: Handgun Rounds
- Gun Powder B: Shotgun Shells
- Gun Powder C: Grenade Rounds
- Gun Powder AAB: Shotgun Shells
- Gun Powder BBA: Handgun Rounds
- Gun Powder AC: Flame Rounds
- Gun Powder BC: Acid Rounds
- Gun Powder CC: Freeze Rounds
- Gun Powder CCC: Magnum Rounds
Base Results for Mixing with Grenade Rounds
- A: Flame Rounds
- B: Acid Rounds
- C: Freeze Rounds
Enhanced Ammo
Handgun Rounds (Gun Powder A + Reloading Tool)
- Number of times for first ammo count increase - 4
- Number of times for second ammo count increase - 3
- Total Number for ability to create upgraded ammunition - 8
Shotgun Shells (Gun Powder B + Reloading Tool)
- Number of times for first ammo count increase 1 - 4
- Number of times for second ammo count increase 2 - 3
- Total Number for ability to create upgraded ammunition - 9
Saving
Like every other main Resident Evil game pre-Resident Evil 4, Resident Evil 3 requires that players find one of the many typewriters located throughout the environments to save, and must also have at least one ink ribbon item in their character's inventory.
Story
Main Characters
The returning heroine from the first game. Jill is an ex-S.T.A.R.S operative who stayed behind in Raccoon City to monitor the Umbrella Corp.'s activities, while the rest of the team (minus Brad Vickers) went to Europe to investigate and gather information. As confident as ever in her abilities, Jill's experience with B.O.W. threats has only hardened her resolve. While she is initially distrustful of the U.B.C.S. that arrive to aid civilians, she is reluctantly forced to work alongside a few remaining members in order to make her escape from the city.
A mercenary who is part of the U.B.C.S. hailing from South America. Carlos is initially portrayed as somewhat laid-back and even a little narcissistic. However he quickly changes his tone as the game progresses, and proves to be a valuable ally throughout the game. He is somewhat infamous for his accent changing midway through the game.
Lieutenant of the U.B.C.S., hailing from Russia. Mikhail is first encountered gravely wounded aboard a train which acts as the remaining U.B.C.S. members' base of sorts. Despite his injuries, Mikhail is shown to be a proud and dedicated soldier and holds few ties to the Umbrella Corp. itself.
A Sergeant of the U.B.C.S. hailing from Russia also. Nicholai is the cold and calculating member of the group, who decides on the plan to ride the train to the Clock Tower for extraction. His first name's unusual spelling (as opposed to the more traditional "Nikolai" or "Nikolay") is likely the result of a localization error; however, the spelling has become canonical for all other appearances of this character throughout the franchise.
The cowardly Alpha team pilot of S.TA.R.S. Brad opted to stay behind in Raccoon City as he didn't want to get involved with the information gathering of the Umbrella Corp. Despite cutting ties with S.T.A.R.S., he is still considered a target by the Nemesis B.O.W.
The primary antagonist and titular character of the game, Nemesis is a unique form of B.O.W. capable of comprehending commands, executing mission objectives independently and utilizing high-power firearms. Its sole mission is to hunt down and assassinate the remaining S.T.A.R.S. members in Raccoon City as specified by Umbrella.
Plot
Nemesis advancing towards JillThe plot of Resident Evil 3: Nemesis follows Jill Valentine and her escape from Raccoon City. Jill initially travels to the Raccoon City Police Station, and after witnessing S.T.A.R.S. member Brad Vickers being brutally murdered by The Umbrella Corporation's latest bio-weapon, code named "Nemesis'', takes shelter in the R.P.D. Jill is able escape the grasp of Nemesis and meets up with surviving U.B.C.S. soldiers consisting of Carlos Oliveira, Mikhail Victor and Nicholai Ginovaef, who have fortified a broken train carriage as a base of operations. Mikhail however is found to be injured severely leaving only Carlos and Nicholai of any use.
The train requires some key components to be able to be of any use however. Nicholai reluctantly accepts Jill's help and they all head out to search for the supplies needed. Throughout Jill's search she will encounter Nicholai in either the gas station or the Management Office, depending on certain choices made by the player. Either way, Nicholai is presumed dead after an attack by zombies or by an explosion. After Jill helps repair the train they begin to travel to the U.B.C.S. evacuation point. Not before Nemesis forces himself aboard the train, however. Mikhail then sacrifices himself with a grenade to try and destroy the Nemesis but at the extra cost of causing the train to crash.
Jill managed to survive the crash and used the Clock tower's dong mechanisms to signal the rescue helicopter, which is soon after shot down by Nemesis. Jill will then have an unavoidable duel against her stalker, but not before getting infected by the T-Virus courtesy of the Nemesis. Jill will still manage to prevail against the Nemesis with him lumbering off and passing out in a field of flames. Carlos arrives soon after and carry's an unconscious Jill to the Clock tower chapel.
Jill finding UBCS soldier Carlos Oliveira on the floor in the News OfficeAt this point the player takes control of Carlos and must travel to the hospital. Along the way, again determined by certain choices made by the player, Carlos will learn of Nicholai's survival and also his true intentions either by another UBCS soldier - who is soon enough blown up by a trap set by Nicholai - or through Nicholai himself. It is revealed that he is one of the ''Supervisors'' and was meant to observe the UBCS's attempts to fight the BOW's for combat-data. For extra cash, he is now killing off the remaining supervisors to be the sole survivor. After a brief encounter with a now mutated Nemesis, Carlos will concoct a vaccine and deliver it to Jill to bring her to full health. Carlos then mentions that there is 'something' he has to do and leaves Jill in the chapel alone. The player then regains control of Jill.
Jill then travels through the Raccoon City park eventually encountering Nemesis once again. Nemesis attacks Jill causing her to flee into the nearby power plant. Jill will meet up with Carlos once more and will be filled in on information regarding the fate of Raccoon City. It has been decided that Raccoon City is to be levelled completely via a missile bombing, regardless of survivors, to try and contain the virus. Both Carlos and Jill opt to split-up and find any means of escaping.
Throughout Jill's travels, she will once again encounter Nicholai. Either outside the dumping facility or piloting the last helicopter, to which he is either killed by the nemesis or by Jill. Another possibility is Nicholai may actually escape the city too. Regardless, Jill will encounter the Nemesis yet again in the waste room. Manipulating the pipes so they spew acid over Nemesis, Jill is able to beat the Nemesis to such an extent that he eventually loses near all of his limbs. Jill then manages to obtain an Umbrella scientist ID card and uses it to make her way to the radio room, to which she will either receive a broadcast from an 'old friend' should Nicholai manage to get to the last helicopter, or will be greeted by Carlos advising Jill to have hope.
Jill, watching from a helicopter as Raccoon City faces its destruction.Jill will make her way down stumbling into the Rail-Gun room, to which the carcass of the Nemesis will soon fall down from above. After feasting on a deceased stage II T-103, it then mutates further into a large almost squid-like creature. With the use of the Rail-Gun, Jill finally puts an end to the Nemesis. She will then take an elevator to the outside and escape via helicopter, which is piloted either by Barry Burton or Carlos depending on a prior choice made by the player.
Watching as the city faces its destruction, the game ends with Jill determined now more than ever to put an end to Umbrella and make them pay for their crimes.
Weapons
A standard combat knife that Jill has had since the Mansion Incident. Largely useless because of its limited reach and minimal damage, the knife is primarily intended for use should the player run severely low on ammo, and even then it's often advised just to run instead. | |
A custom Beretta handgun that uses 9mm rounds. It was built by the Kendo Gun Shop under orders from S.T.A.R.S. weapon specialist Barry Burton for the S.TA.R.S. team. Unfortunately, most of the S.T.A.R.S. team were declared deceased or MIA for when the firearm was ready, with Barry Burton, Chris Redfield, Rebecca Chambers, Jill Valentine, and Albert Wesker as the only proprietors. This weapon was eventually retconned to become the Samurai Edge pistol, to which all STARS members had their own unique variant. While it has a noticeably faster rate of fire over the starting handguns from Resident Evil 2, its overall damage output and stopping power is low, making it only suitable for the lesser enemies of the game such as zombies. - Maximum Ammo Count: 15 rounds
- Standard Ammunition: H. Gun Bullets (9x19mm Parabellum rounds)
| |
STI Eagle 6.0A custom handgun mostly used for sport. This is attained by defeating the Nemesis on Hard mode twice during any of the encounters. First encounter will reward players with Eagle Parts A, and the second with Eagle Parts B. From there the player need only combine them to receive the handgun, fully loaded. It is considerably faster than Jill's S.T.A.R.S. custom, and has a moderate chance to pop a zombies head much like the Magnum Revolver, killing it instantly. - Maximum Ammo Count: 15 rounds
- Standard Ammunition: H. Gun Bullets (9x19mm Parabellum rounds)
| |
SIGPRO SP2009The standard arms handgun for the U.B.C.S. mercenaries who are sent to rescue the civilians of Raccoon City. It is fundamentally the same weapon as Jill's default STARS custom, though it has a unique gun model and firing sound effect. It is only available for use by players during the portion where players briefly take control of Carlos in the main game, and when playing as Nicholai during the Mad Jackal mini-game. While it's possible he could be using a different pistol, Brad Vickers' handgun shares the same firing sound effect as the SIGPRO. - Maximum Ammo Count: 15 rounds
- Standard Ammunition: H. Gun Bullets (9x19mm Parabellum rounds)
| |
A reliable shotgun, with a good, strong kick that can damage multiple enemies if they're close together enough. As is tradition with shotguns in Resident Evil, the player can aim up when a zombie is close and there'll be a high chance to completely destroy the head, or can alternatively aim low under the same circumstances to shoot a zombie's legs off. - Maximum Ammo Count: 7 shells
- Standard Ammunition: Shotgun Shells (12-gauge shells)
| |
A faster, and equally as powerful, shotgun alternative to the Benelli. Like the Eagle Handgun, this western classic is only attained by beating the Nemesis multiple times on Hard mode. Though to have him drop the parts to build the shotgun, players must beat him five consecutive times. The first two to unlock the Eagle handgun parts, the next to unlock a first aid spray case, and the final two for the parts to create the M37. Despite its in-game classification as a shotgun, this weapon's appearance is based on a customized Winchester Model 1892 rifle commonly referred to as the "Mare's Leg". - Maximum Ammo Count: 7 shells
- Standard Ammunition: Shotgun Shells (12-gauge shells)
| |
S&W M629C MagnumOne of the most powerful weapons in the game, the Magnum is efficient against all enemies. It can kill practically every regular enemy with a single shot and is a great contender against boss battles. It has high recoil, however, and ammo is incredibly scarce. - Maximum Ammo Count: 6 rounds
- Standard Ammunition: Magnum Bullets (.44 Magnum rounds)
| |
A semi-hidden weapon that is mostly recognized as Carlos Oliveira's trademark firearm. If the player chooses to play the story mode on the easy setting, Jill will start off with this weapon from the beginning. Otherwise it is only unlockable through the Mad Jackal minigame, that which can be bought with cash accumulated through completions and/or attempted completions of the mode. It has two selectable firing settings, Auto and Manual. Auto sets its firing rate to fully-automatic, whereas Manual will set it to a three-shot burst, while also changing the player's firing stance when in use to aiming down its sights as opposed to from the hip. - Maximum Ammo Count: 100 rounds (indicated by percentage)
- Standard Ammunition: 5.56mm NATO rounds
| |
Mine ThrowerAn unorthodox weapon only found by the player during the Hard mode setting. It fires mines at the enemy which fester within for a couple of seconds before exploding. Should it be combined with the infinite ammo belt, or is equipped while the 'Infinite ammo for all weapons' unlockable setting is in effect, it will instead fire instant-explosion mines. - Maximum Ammo Count - N/A
- Standard Ammunition - M.T. rounds
| |
Hk-p Grenade LauncherOne of the most powerful, and also diverse, weapons, it can equip a multiple number of grenade types. It's most commonly equipped with the standard grenade rounds, but it can also be fitted with flame, acid, and even freeze rounds. It's a master of all trades, and the ideal weapon for many of the boss battles. It's also made convenient in that it can stock as much ammo as players can find, so long as they keep it to the same grenade type. Should the player decide to switch grenade types, the accumulated grenades players had equipped will be switched back into their inventory while only taking up a single slot. - Maximum Ammo Count - N/A
- Standard Ammunition - Grenade rounds
| |
Another unlockable weapon that can only be attained via the Mad Jackal minigame. It has infinite ammo and can tear through anything, though it has a slow build up. - Maximum Ammo Count - Infinite
- Standard Ammunition - N/A
| |
An old four-shot launcher that can be found near the end of the main game, and can also be unlocked with infinite ammo via the Mad Jackal minigame. It can kill every enemy, excluding bosses, with a single shot. - Maximum Ammo Count - Infinite
- Standard Ammunition - N/A
| |
Enemies
Basic Enemies
The zombie is the most common adversary among most Resident Evil games, including Resident Evil 3. They are generally weak, though can potentially overwhelm with their numbers. While they are also slow and sluggish in movement, they will sometimes break into a quick sprint. They will generally attempt to bite at the player character, though if the player is above or below, they will instead attempt to vomit acid towards them. All weaponry is effective, though the handguns and shotguns of the game are the most efficient. | |
Another trademark enemy of the series, the Zombie Hounds are always encountered in packs, and contain the same agility and brutality as a standard dog. They're rather weak, however, and can be taken down swiftly with a few handgun or shotgun shots. They are easy to stunlock as well, as any shot from even a pistol will knock them off balance; continued shots will be able to keep them locked to the ground until death. | |
Drain DeimosThese are exclusive to Resident Evil 3 and were conceived accidentally as infected fleas. They have the ability to crawl up walls and surfaces and are rather fast. They usually operate on four limbs, though will occasionally rise to two when agitated and will charge at the player with increased speed. If grabbed, it resembles the creature to be sucking on the character's face, doing a moderate amount of damage. Killing Drain Deimos requires a few shotgun rounds, though It's also easy to avoid them altogether since they like to crawl around walls and ceilings, and will often only opt to give chase at the last moment. | |
Brain SuckerThese are almost identical to the Drain Deimos, though they can inflict poison on the player and have a more greenish look to them over the murky orange the Drain Deimos have. | |
Much like most Resident Evil iterations, Crows only act as more of a nuisance than a genuine threat. They are always found to be in a large number, however, and can be very hard to avoid. They only have one attack by way of pecking at the player, which while does little damage will keep the player stuck in a short animation of trying to wave them off. | |
Returning from the original Resident Evil, these are mutated Hunter models that are distinctively red over their standard green Alpha counterparts. They are equally as deadly, however, and are always encountered with at least another around the corner. They are formidable enemies overall and can still swipe the player's head clean off should their character's health be in the Caution state or lower. The Magnum is the most suited weapon when faced against them for its quick efficiency; automatic weapons are also a valuable asset against Hunters due to their high chance to keep a Hunter stun-locked. | |
These kind of hunters are more related to amphibians--specifically frogs--than lizards. While they share the same body type, in place of fangs and boils they have a large gaping mouth which they can use to swallow a character whole, should the character's health status be in the "Caution" or "Danger" state. | |
Web SpinnersMuch like zombie hounds, these are to be found in nearly every Resident Evil game to date. They are primarily just spiders, though they all also have the ability to poison the player via a spray of spit. Should a giant spider die with its sack still intact, hundreds of miniature spiders will begin to seep out and attack the player. However they do even less damage than the crows, and should the player leave the area they'll return to find them all gone. | |
Sliding WormsAnother enemy only found in Resident Evil 3, these are worms that have been hatched by the larger Gravedigger worm. They attack by jumping at the player and sticking to them, sucking blood at an exuberant pace because of their increased size. Oddly enough all the player has to do to avoid them is just keep running, no matter the direction; they'll quite literally dive right through the character model and will leave no damage. Should they manage to latch on to the character, however, the player won't be able to leave the area until they've shackled it off. | |
Bosses
Resident Evil 3 features several set piece encounters against powerful boss characters. The majority of these battles are fought against Nemesis in his various incarnations.
Nemesis (First Form)
Art of the default Nemesis, holding the corpse of Brad Vickers.Nemesis is the most prominent and recurring boss battle the player will face. Initially, he is encountered in his trademark state wearing his huge leather jacket. He will be faced seven times during this iteration, though six of those can be avoided. The player can still face off against Nemesis, however, and may even be able to temporarily down him for the time being. Should the player be playing on the Hard mode setting, Nemesis will drop a reward each time he falls. He will usually rely on his brute strength to attack the player, punching and throwing Jill around with ease. However, he also has an attack where he grabs the character and then attempts to force his tentacle down their throat. This attack is tremendously powerful, and can kill the player when they're in the Caution state.
Sometimes he will be equipped with his own personal rocket launcher, which as one would expect does a significant amount of damage if hit by a rocket. If close enough, he will still attack by using the launcher as a melee weapon, which does slightly more damage than his regular melee attacks. Ammunition for his launcher is limited, however, and after enough shots he will discard the launcher and revert back to his normal moveset. The option to flee is always there--minus the seventh, which forces the player to face him for story purposes--however Nemesis will give chase up until a point, and will even stalk the player through different rooms, which at the time was unheard of for the series. Running from Nemesis can prove to be just be difficult as fighting him, however, as he can catch up to the player with ease -- often with a quick punch that'll do damage to the player. Fortunately he will only only ever use his right hand, so it is possible to read these patterns and avoid his attacks.
A minor variation of Nemesis' original form can optionally be fought in the Clock Tower courtyard. This version of the Nemesis now has an exposed tentacle he'll use as a whip for long distance. However, his standard move-set is still available and he largely requires the same tactics to best. However, this particular state of Nemesis is only faced depending on if the player decided to use the emergency brake whilst riding the runaway cable car, otherwise Jill will face the default Nemesis equipped with his rocket launcher.
Nemesis (Second Form)
After the climactic battle in the courtyard, the successive damage inflicted by Jill and Carlos, and the fire he passed out in after the previous battle, Nemesis's leather jacket has now been completely torn, exposing tentacles and boils that have formed across his body. The player will encounter this form of Nemesis at least twice; first as Carlos--and again as Jill if the player doesn't do enough damage during his part of the story--and secondly for story purposes, where the player must use valves to spray acid on Nemesis. During this state, he relies greatly on his long range tentacle attacks and will make liberal use of his ability to grab the player and then slam them against the floor multiple times. If the player is in the Caution state, they may be killed outright by this attack. The boss battle against Nemesis' second form nearly destroys him, as he quite literally falls apart after enough damage has been dealt.
Nemesis (Final Form)
Nemesis is encountered in his third and final form at the end of the game. What remains of the monster will drop down to the ''waste disposal'' center, which houses numerous Tyrant models that have been discarded. Upon locating a mutated Tyrant model, it will begin to feed on it, allowing Nemesis to grow into a large, almost reptilian-like creature. This final form of Nemesis is practically invincible, and can only be defeated via the use of an experimental Railgun -- a weapon that is so powerful that it requires four huge batteries to power and around thirty seconds to fully charge.
Gravedigger
Essentially a giant worm, though one that has its head exposed to reveal a giant array of sharp teeth. The first encounter with Gravedigger is set within a small series of underground corridors. The player needs to press a series of buttons to lower the ladder to climb back up, whilst being in constant danger of having the worm pop out whenever the player gets close to one of the buttons. Through precise timing, the player can leave the area without ever having to fire a single shot. The alternative option is to instead attempt to ward off the worm, though this may take a fairly significant amount of ammunition.
Jill faces off against the giant worm a second time during the Raccoon Park section, now with no chance of avoiding a fight this time around. The graveyard where Jill encounters the worm is destroyed and has been transformed into a narrow path. The worm will hide underground most of the time, but will sporadically pop out to give chase and attack. There is a small puddle of water and an electrical light that the player may shoot to electrocute the worm for an instant kill, though it requires incredibly precise timing to pull off.
Umbrella Helicopter
An optional boss that can be encountered by choosing the appropriate Live Selection option at the end of the game. This was the first ever non-B.O.W. boss battle the series featured, and has Nicholai in a chopper equipped with duel miniguns. The battle plays out simply, with Jill given some slight cover to avoid the chopper's miniguns, and is then tasked to return fire during the weapons' cooldown period. If Jill takes too long to take Nicholai's chopper down, he will manage to escape. The chopper is rather robust as well, and can withstand up to around 3-4 shots with the rocket launcher.
Live Selection
Throughout the game, the player will find themselves in life-threatening situations that require split-second decisions. These encounters typically result in either evading Nemesis or using part of the environment to the player's advantage to weaken him. Some, however, have a much larger effect on the game and can alter certain scenarios; one in particular will even determine the ending.
Live Selection 1: R.P.D. Station
Upon reaching the R.P.D. station courtyard for the first time, Nemesis brutally murders Brad Vickers before setting his sights towards Jill.
- Fight with the monster: The scene immediately reverts back to standard gameplay. Despite the player's option to fight Nemesis, they can still run into the police station through the front entrance, losing Nemesis in the process. This option can also prove useful for retrieving a S.T.A.R.S. ID card earlier than usual by collecting Brad's from his corpse.
- Enter the police station: Avoids the first encounter with the Nemesis altogether.
- Do nothing: Nemesis attacks Jill and the scene will proceed as if the the first option had been chosen.
Live Selection 2-A: Restaurant
This Live Selection can occur in two separate locations, although the ultimate results of both Live Selections are roughly identical. After meeting Carlos for the first time in the restaurant, their introduction is interrupted by the sudden arrival of Nemesis.
- Run into the basement: After Jill and Carlos enter the restaurant's basement, some water pipes will burst and begin flooding the room. Several zombies also appear here. Players can escape through a ventilation shaft leading outside, allowing the pair to temporarily evade Nemesis. However, if too much time passes while inside the flooding basement, Jill and Carlos will automatically climb back up the ladder and must confront Nemesis directly.
- Hide inside the kitchen: Jill locates a lit oil lantern and throws it at Nemesis. This will ignite the gas leak in the restaurant's kitchen, temporarily knocking out Nemesis with an explosion. If playing on the Hard mode setting, Nemesis also drops a weapon case for the player to collect.
- Do nothing: This forces the player to fight against Nemesis with assistance from Carlos.
Live Selection 2-B: Newspaper Office
This Live Selection can occur in two separate locations, although the ultimate results of both Live Selections are roughly identical. After meeting Carlos for the first time in the newspaper office, their introduction is interrupted by the sudden arrival of Nemesis.
- Jump out of the window: Jill and Carlos leap through a nearby window to temporarily evade Nemesis. This option grants access to a locked back alley containing two Red Herbs.
- Hide in the back: While Jill and Carlos conceal themselves, Nemesis is knocked out by an explosion from an adjacent office. If playing on the Hard mode setting, Nemesis also drops a weapon case for the player to collect.
- Do nothing: This forces the player to fight against Nemesis with assistance from Carlos.
Live Selection 3: Power Plant
At the power plant, Jill opens one of the shutters via a specific button combination at the controls, only to be startled by a horde of zombies banging against a nearby fence.
- Head to the emergency exit: Initially too rusty to open, Jill will now instead barge through and escape outside, possibly with Nemesis awaiting.
- Increase electricity output: This will send a strong current through the fence causing all zombie heads to explode; the combination required to open the second shutter will have altered, however.
- Do nothing: The zombies will break through the fence and attack.
Live Selection 4: Parking Garage
While making her way through the parking garage, a sudden tremor causes the floor beneath Jill to crumble, leaving her dangling from the edge of a deep hole. Although she tries to hoist herself up, two heavy crates begin sliding out of the back of a nearby truck and directly towards Jill.
- Climb up: Jill climbs up and avoids the sliding crates.
- Jump down: Jill jumps down and avoids the falling crates. She will then come across a giant dead worm and will have to climb up a ladder to leave the area, finding herself in the outer car park.
- Do nothing: The crates collide with Jill, sending her to the bottom of the hole as if she had jumped down herself. Jill also takes some damage.
Live Selection 5: Cable Car
After Mikhail sacrifices himself to blow Nemesis out of the cable car with a grenade, Carlos loses control of the vehicle, which is now on a collision course with the Clock Tower.
- Jump out of the window: Jill will dive out of the window landing just a little ways away from the Clock Tower; Carlos is seen to be still onboard the train as it crashes, however. This options set in motion the event of Carlos arriving to Jill's side after she had fought Nemesis--equipped with his rocket launcher--on her own.
- Use the emergency brake: This has no effect and will leave Jill aboard the train as it crashes; Carlos can be seen jumping out of the window. This option sets in motion the event of Carlos arriving to fight Nemesis with Jill in the Clock Tower courtyard; he will be knocked unconscious by Nemesis, but will have at least been able to destroy his rocket launcher, dealing a noticeable amount of damage.
- Do nothing: The same result as the first option.
Live Selection 6: Clock Tower
Just below the Clock Tower machinery room on an outside balcony, Jill will again be confronted by Nemesis.
- Use the light: Jill turns on the searchlight, blinding Nemesis, and then pushes him off the balcony
- Use the cord: Jill throws the electrical cord into a puddle of water close to Nemesis, electrocuting him severely. This will leave Nemesis temporarily unconscious, but he will awake shortly after. If playing on Hard mode, Nemesis will also drop a weapon case.
- Do nothing: Nemesis will continue to advance towards Jill until the scene reverts back to normal gameplay.
Live Selection 7: Factory
Jill's way is blocked by Nemesis as she crosses a rickety bridge leading toward the abandoned factory.
- Push him off: Jill will dodge an attack and then push Nemesis off the bridge into the water below. This sets in motion the ending of Nicholai being killed by Nemesis and Carlos finding the last helicopter.
- Jump off: Jill will dodge an attack and jump off the bridge landing near the sewer entrance to the facility. This sets in motion the ending of Nicholai reaching the helicopter and Barry Burton arriving to the rescue.
- Do nothing: Nemesis will knock Jill off the bridge setting in motion the same events of the second option, but with Jill also having taken some damage from the attack.
Live Selection 8: Helicopter
This Live Selection only occurs if the player chose to jump off the bridge or do nothing during Live Selection 7. Jill discovers Nicholai attempting to escape from the Factory inside the last functional helicopter in the area.
- Negotiate with Nicholai: Jill tries to reason with Nicholai about his actions and asks about his motives. Nicholai will answer but then fly away, escaping Raccoon City. This bit of dialogue will also be spoken by Nicholai just before he is killed by Nemesis in the scenario where Jill pushes Nemesis off the bridge.
- Return fire to the chopper: The player regains control and has the option to return fire at the helicopter, potentially killing Nicholai. If the player takes too long to destroy the helicopter, Nicholai will escape.
- Do nothing: Nicholai escapes.
Live Selection 9: Escape
Following the destruction of Nemesis' third form with the experimental railgun, what little of him remains crawls towards Jill in one final attempt to kill her.
- Exterminate the monster: Jill dodges Nemesis' acid-spit attack and retrieves a nearby .44 magnum. She unloads all six rounds into the quivering mass and puts an end to Nemesis once and for all.
- Ignore it and evacuate: Jill will continue her escape and head to the elevator.
- Do nothing: Nemesis spits acid at Jill, poisoning her before the monster finally dies from exhaustion. It reverts back to gameplay allowing the player to head onto the elevator. The poison attack by Nemesis has no effect on the overall ending.
Unlockables
Like most Resident Evils, Resident Evil 3 has a huge assortment of unlockable features to add to the game's replay value including weapons, costumes and a minigame to help prolong the game's length.
There also exists 8 Epilogue stories which give the player some insight into what the main characters were doing after their last Resident Evil game appearances. The epilogues give note to the upcoming games, Code Veronica and Resident Evil 4, and also gave players the first ever shot of USS agent HUNK without his helmet. Each Epilogue is unlocked after a single completion, requiring the player to complete Resident Evil 3: Nemesis 8 times to unlock them all.
Should the player manage to collect every file in order through the game, upon a new game will find Jill's Diary added to their files. The file is as follows:
''August 7th
Two weeks have passed since that day. My wounds have been healed, but I just can't forget it. For most people, it's history now. But for me, whenever I close my eyes, it all comes back clearly. Zombies eating people's flesh and the screams of my teammates dying. No, the wounds in my heart are not healed yet...
August 13th
Chris has been causing a lot of trouble recently. What's with him? He seldom talks to the other police members and is constantly irritated. The other day, he punched Elran of the Boy's Crime department just for accidentally splashing Chris's face with coffee. I immediately stopped Chris, but when he saw me he just gave me a wink and walked away. I wonder what happened to him...
August 15th
Midnight. Chris, who has been on a leave of absence for a "vacation," called me so I visited his apartment. As soon as I walked into his room, he showed me a couple of pieces of paper. They were part of a virus research report entitled as simply as "G". Then Chris told me that, "The nightmare still continues." He went on to say that, "It's not over yet." Ever since that day, he has been fighting all by himself without rest, without even telling me...
August 24th
Chris left the town today to go to Europe. Barry told me that he would send his family to Canada and then he would follow Chris. I decided to remain in Raccoon City for a while because I know that the research facility in this city will be very important to this entire case. In a month or so, I'll be joining with them somewhere in Europe. That's when my real battle begins...''
Alternate Costumes
Much like past Resident Evil games, upon completion of RE3 the player is given a letter rank ranging from D (worst) to S (best). It's made up of varying factors such as how long it took to complete, how many first-aid sprays were used, and how often the player saved. These ranks would determine what costumes the player would unlock for any following playthroughs.
The costumes were attainable by first collecting the boutique key out of the inventory box, and then unlocking the boutique located near the bar early on. Inside are five dressing rooms, each with one of the available costumes. For the PC version, all costumes (including two extra) are unlocked from the outset and Jill's costume is selected from the very start of the game.
- Jill's classic S.T.A.R.S. outfit from Resident Evil.
- A 70s disco outfit.
- A biker outfit.
- A standard police officer uniform w /miniskirt
- A Regina skin, who's best known from the Dino Crisis series.
- Jill's original costume, but while also wearing a black shirt over her tube top - PC & Dreamcast Exclusive.
- A casual outfit made of black leather pants and a light blue sleeved shirt - PC & Dreamcast Exclusive.
Nemesis Rewards
During each Nemesis bout amidst the main game on the Hard mode difficulty, should Jill manage to beat him he will drop a silver-case which contains items to help Jill's story, ranging from new weapons to healing items.
- Bout 1. 9mm Eagle handgun parts A.
- Bout 2. 9mm Eagle handgun parts B.
- Bout 3. First aid spray case with 3 first aid sprays.
- Bout 4. Sawn off shotgun parts A.
- Bout 5. Sawn off shotgun parts B.
- Bout 6. First-aid spray case with 3 first aid sprays.
- Bout 7. An infinite ammo pack that when combined with a weapon will give it unlimited ammo from then on. Note: can only be used once.
The Mercenaries: Operation Mad Jackal
Operation Mad Jackal's title screenAfter a single completion of the game, Operation Mad Jackal becomes available. It has the player choose between the three mercenaries, Carlos Oliveira, Mikhail Victor and Nicholai Ginovaef -- each with their own distinctive weapon load-out that acts as the different difficulties. Mikhail being the easiest, followed by Carlos then Nicholai.
The objective is to make it from the fortified train to the warehouse save room. There is, however, a ticking down timer which is based upon a bomb being placed within the mercenaries. To gain more time, the player can kill enemies as well as save hostages - which will reward players with some added supplies. Upon completion, the mercenary is beckoned by a shadowy figure who asks his female associate to hand an Umbrella marked briefcase, which contains the player's cash reward. Even if the player fails due to death, or expiration of time, they are still marked with a rank and given a cash sum. The mode was conceived by Yasuhisa Kawamura, and the design was inspired by The Running Man film.
The enemies encountered are all pulled from the main story-line, including multiple encounters with the notorious Nemesis, which sometimes even includes him alongside other BOW creatures as well. One such quirk the minigame features is a section that is patrolled by two Nemesis's - each equipped with a rocket launcher. Through careful manipulation, it's possible to actually force the two Nemesis's to duke it out if the player manoeuvres well enough so one Nemesis may accidentally shoot or attack the other.
Completion of the game will award the player a rank between D to S as well a cash sum, which can then be used to purchase the unlockable weapons for the main game and the option to have infinite ammo for all weapons in the main game.
The Mercenaries
Mikhail Victor
- Benelli Shotgun
- S&W M629C Revolver
- Rocket Launcher
- 21 shotgun rounds
- 18 magnum rounds
- A mixed herb portion, made of a single green, red and blue herb
Carlos Oliveira
- M4A1 Assault Rifle
- STI Eagle 6.0. Pistol
- 90 handgun bullets
- A mixed herb portion, made of a single green, red and blue herb
- A mixed herb portion, made of a single green, red and blue herb
- A mixed herb portion, made of a single green, red and blue herb
Nicholai Ginovaef
- Combat knife (Kills with the knife rewards the player with a much greater time bonus)
- SIGPRO SP2009 Pistol
- First aid spray
- First aid spray
- First aid spray
- Blue herb
Hostages
There are six hostages located throughout the available locations that Mad Jackal allows that reward a bonus of 20 seconds to the timer, and supplies which vary depending on which character the player is. The way to save them is to kill all enemies within the area, then to press the action button next to the hostage. All hostages are characters taken from the story, and the final two are whichever two other mercenaries that are remaining, after the player's selected character. A hidden timer also persists for each hostage as well, which, if expired, will have the player arrive to find the hostage killed. A quick way for players to determine if a hostage is dead before they reach the body is to note the lack of any opposition within the room the hostage was kept; if there are no enemies in the room, then this signifies that the hostage was killed.
The list of the hostages and their whereabouts are as follows:
Dario Rosso
- Located in the garage of the Gas Station.
- Enemies: Zombies
- Rewards: Mikhail - shotgun rounds / Carlos - handgun rounds / Nicholai - handgun rounds.
Female Survivor
- Located in the top floor of the News Office.
- Enemies: Zombies.
- Rewards: Mikhail - shotgun rounds / Carlos - handgun rounds / Nicholai - EX handgun rounds.
Brad Vickers
- Located in the basement of the Restaurant.
- Enemies: Zombies.
- Rewards: Mikhail - magnum rounds / Carlos - first aid spray / Nicholai - first aid spray.
Marvin Branagh
- Located in the emergency exit hallway of the Power Station.
- Enemies: Nude zombies.
- Rewards: Mikhail - magnum rounds / Carlos - first aid spray / Nicholai - first aid spray.
Nicholai/Mikhail
- Located in the stock room of the Chemist.
- Enemies: Gamma Hunters.
- Rewards: Mikhail - first aid spray / Carlos - first aid spray / Nicholai - first aid spray.
Carlos/Mikhail
- Located in the Bar.
- Enemies: Zombies
- Rewards: Mikhail - EX shotgun rounds / Carlos - handgun rounds / Nicholai - handgun rounds.
Rewards
- M4A1 Assault Rifle with infinite ammo for 2000$
- Gatling Gun with infinite ammo for 3000$
- Rocket Launcher with infinite ammo for 4000$
- Infinite ammo for all weapons in Resident Evil 3 9999$ Note: cannot be turned off
Versions
- PlayStation: The standard version of the game. Whereas the first two games had separate editions for DualShock controls, the standard version of Resident Evil 3 came with DualShock controls by default.
- PC: While the PC version includes higher-resolution character models, the backgrounds and cutscenes are lower-resolution. This version allowed the player to pick Jill's costumes from the New Game option and featured two new costumes. It also had the Mercenaries mode unlocked at the main menu from the start.
- Dreamcast: Often considered the best version of the game. It features high resolution character models and backgrounds. The cutscenes are in high resolution. Like the PC version, the player is able to play Mercenaries mode immediately and also pick Jill's costumes immediately. Like Resident Evil 2 and Resident Evil: CODE: Veronica on Dreamcast, the VMU displays the character's health.
- GameCube: Technically, the game is a port of the PlayStation version, which doesn't have any content unlocked from the start. It does, however, have the high resolution character models and backgrounds like the Dreamcast version.
Soundtrack
The soundtrack for Resident Evil 3: Nemesis was released in September 22th, 2009 in Japan. Later, versions for Europe and USA were also released. The original album is entitled Resident Evil 3: Last Escape Original Soundtrack. The music was composed by Masami Ueda and Saori Maeda.
Disc 1
| # | Title | Length |
|---|
| 1. | The Last Escape | 0:18 |
| 2. | Option Screen | 0:55 |
| 3. | Title Calling | 0:07 |
| 4. | Her Determination | 0:57 |
| 5. | The Opening | 1:32 |
| 6. | The Beginning of Nightmare | 1:23 |
| 7. | Is There A Way Out? | 0:35 |
| 8. | The Great Novelist | 1:49 |
| 9. | Free From Fear | 2:34 |
| 10. | Meeting Brad | 1:09 |
| 11. | Cold Sweat | 0:46 |
| 12. | The City of Ruin | 2:34 |
| 13. | Imminent Slaughter | 0:27 |
| 14. | Nemesis' Theme | 1:18 |
| 15. | Feel The Tense... | 2:07 |
| 16. | The Front Hall | 1:55 |
| 17. | The First Floor | 3:07 |
| 18. | Well Dressed Up | 1:03 |
| 19. | The City Without Hope | 3:26 |
| 20. | Watch Out For Your Back | 1:08 |
| 21. | Carlos' Theme | 1:31 |
| 22. | Never Give Up The Escape | 2:32 |
| 23. | Nicholai's Theme | 1:42 |
| 24. | Together for the Escape | 1:24 |
| 25. | Valediction | 2:43 |
| 26. | Coldhearted Soldier | 2:28 |
| 27. | Quick & Fast Relief | 0:09 |
| 28. | The Common Cure | 0:11 |
| 29. | Escape to Ecstasy | 0:10 |
| 30. | Zombies Trespassing | 0:23 |
| 31. | Free Falling | 0:56 |
| 32. | Abrupt Gunfire | 1:11 |
| 33. | Don't Come Any Closer! | 1:26 |
| 34. | Complete Rest | 2:39 |
| 35. | Hero Time | 2:20 |
| 36. | S.G.G.S. Explosion | 0:16 |
| 37. | Pride and Valor | 0:26 |
| 38. | An Impending Danger | 0:47 |
| 39. | Cable Car Crash | 0:14 |
Disc 2
| # | Title | Length |
|---|
| 1. | Ominous Presentiment | 0:12 |
| 2. | The Clock Tower | 3:30 |
| 3. | Don't Lose Courage | 2:00 |
| 4. | No Rest for the Wicked | 2:43 |
| 5. | Mysterious Orgel (Correct) | 0:13 |
| 6. | Mysterious Orgel (Wrong) | 0:15 |
| 7. | From Relief to Terror | 0:31 |
| 8. | Menacing Nemesis | 1:29 |
| 9. | Unstoppable Nemesis | 1:47 |
| 10. | Bring Back Her Consciousness | 2:25 |
| 11. | The Hospital | 2:45 |
| 12. | Traitor | 1:08 |
| 13. | Almost There... | 0:23 |
| 14. | Nemesis Again | 1:42 |
| 15. | Nothing But a Pawn | 1:16 |
| 16. | Earthquake? | 0:20 |
| 17. | The Grave Digger | 1:46 |
| 18. | The Park | 2:47 |
| 19. | The Disused Plant | 2:43 |
| 20. | All of a Sudden | 0:35 |
| 21. | The Worst Scenario | 1:38 |
| 22. | Defiant Behavior | 0:50 |
| 23. | The Last Argument | 1:47 |
| 24. | Deservedly Death | 0:21 |
| 25. | Four Minutes Before the Treatment | 1:07 |
| 26. | Nemesis Doesn't Give Up | 3:24 |
| 27. | Treated To Resurrect | 0:19 |
| 28. | Missile Approaching | 3:11 |
| 29. | Against the Chopper | 1:38 |
| 30. | Emergency Level D | 3:02 |
| 31. | Nemesis Final Metamorphosis | 3:40 |
| 32. | The Last Decision | 0:41 |
| 33. | The Second Chopper (Ver.1) | 0:12 |
| 34. | The Second Chopper (Ver.2) | 0:26 |
| 35. | The Second Chopper (Ver.3) | 0:38 |
| 36. | Euthanasia of Raccoon City | 0:57 |
| 37. | Unfortunate Event | 1:04 |
| 38. | Staffs & Credit | 2:01 |
| 39. | Ever After | 1:48 |
| 40. | Title Calling (Arranged Ver.) | 0:07 |
| 41. | Choose The Best One | 1:21 |
| 42. | The Doomed City | 2:42 |
| 43. | Hellish Agony | 3:00 |
| 44. | Freedom Obtained | 1:17 |
| 45. | Reward and Result | 1:13 |
| 46. | CM-1 (Short Ver.) | 0:18 |
| 47. | CM-2 (Long Ver.) | 0:31 |
Log in to comment