Gameplay
2Fort is a very popular Capture the Flag map that dates back to the original Team Fortress mod for Quake. It has since appeared in many derivative mods and games, including Team Fortress Classic, Weapons Factory, Quake 3 Fortress, and Team Fortress 2. While each of the variations are different, they are all recognizably members of the same family. The content below is specific to the Team Fortress 2 variant of 2Fort.
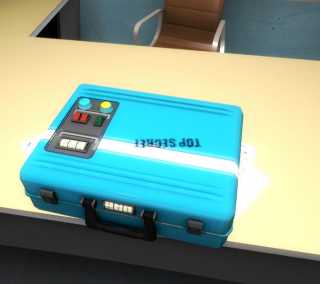 The coveted intelligence
 The Setup
2 Fort is a
Capture the Flag map, the intelligence representing the Flag. The intelligence is a huge briefcase stuffed with important documents and "TOP SECRET" stamped on top. 2 Fort is generally played to 3 captures, one capture qualifying as taking the enemy briefcase from their intel room all the way back to your team's briefcase starting point; your intelligence need not be there when you try to capture.
If an intel holder presses L or is gunned down, the intelligence is dropped and will sit on the spot for 30 seconds before instantly returning to the its owner's intelligence room. During the 30 seconds, the team that owns the case cannot pick it up and return it manually, making its defense a very high priority.
Because of the 2 Fort bases' complexity and respawn placement, a briefcase that makes it into the opponent's base is more-or-less guaranteed to make it the rest of the way to the intel room and score a point. Points are awarded to players only for bringing the enemy intel to their intel room, not for picking it up.
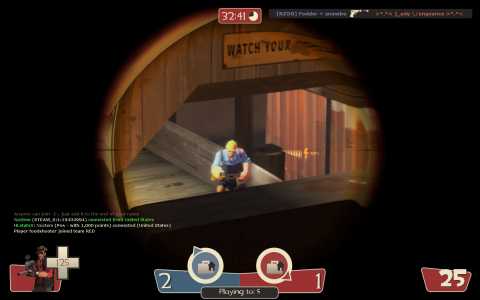 No one can hide from the scope.
Extended Conflict
For a variety of reasons, 2 Fort tends to have very long games (the average round, according to TF2 Stats, lasts 46 minutes). Most of this comes from the outside element that everyone must pass through to get to and from the enemy's base.
Though Valve added a hood to the bridge early in development to keep the center from being completely dominated by snipers, this addition does not provide even reasonable protection from a good sniper. As a result, any assault force must be large in number to overcome any fire from the battlements.
The second explanation is the positioning of the respawn points in front of the intelligence room. The respawn time on most servers for 2 Fort is between 10 and 20 seconds. If an attacker comes into the base through the battlements, it is very likely that any opponent he killed going through the defense's primary spawning area will respawn by the time the attacker gets to the intelligence, meaning the defenders have knowledge of the intrusion and are in the perfect location to stop it. The intel room is also very easy to defend with Engineers, though this tactic causes a dramatic increase in the number of Spies who play this map (a number that is plenty high regardless).
Class Priority
The Scout, Sniper, Engineer, Spy are all obvious picks for this map--Scouts for their "get-in get-out" capabilities, Sniper have the middle ground to contest at ranges only they can attack from, Engineers for the number of defensable chokepoints, and Spies...because there are so many Engineers and Snipers. The Heavy tends to get shafted on this map because the wide open area in the middle makes him a huge target for Snipers and he does not have the mobility to get all the way through an enemy base before being overwhelmed, even when escorted by a Medic. He is also in trouble from the abundance of Spies.
Layout
2 Fort, as its name implies, has two identical bases--one for Red and one for Blu--sitting on either side of a large ditch filled with water.
 A bird's eye view of the 2 Fort battleground.
The Main Entrance
Each base has two front doors that conjoin into a main foyer with a grated second level overlooking it. This grate has a hole for defenders to shoot through or, for attackers, a Soldier or Demoman may rocket jump up the grate and proceed into the primary spawn area for the base. The foyer has three branch-offs: (from the viewpoint of an attacker coming in) the left exit leads down to the underground tunnel network, the forward exit is a narrow elbow leading to a courtyard with a hole in the roof for defenders to drop through from the secondary spawn point, and the right exit leads an elbow that also connects to the courtyard but is much wider. The right path is the normal direction both attackers and defenders take for a combination of convenience and freedom of motion.
The front doorsThe foyer from a defender's perspective.The foyer-courtyard elbowThe foyer's long corridor
The Underground Tunnel
The ditch in the center of the map has a covered bridge that spans it length, though the ditch can be jumped into and used to infiltrate either base using a large-diameter tunnel network consisting of one large elbow with health and a staircase leading up to the base. The large elbow in this pipe system is a popular forward base locale for Engineers because of its ammo pickup and convenient positioning for sentries.
The staircase has a small corridor at the top that connects to the base's foyer. This alternate route really doesn't bring you very far into the base--it only connects to the inner room on the front entrance. Its primary benefit is to keep players from being picked off by sniper fire on the upper route or to simply flank in conjunction with a frontal assault.
![The middle]() The middle "ground" The staircase leading up from the tunnel network
The middle "ground" The staircase leading up from the tunnel network The Battlements
2 Fort is notorious for being a Sniper fest at times. This is thanks to the battlement section of each base. It consists of a second story open platform that extends across the entire base front. Both ends are inside and thus protected from enemy fire. Snipers go in and out of these areas as a staple defensive protocol. One end leads directly into a spawn zone, keeping attackers from using this corridor at all, and the second leads into a large room in front of the primary spawn point, making it tough to use offensively. The center of the battlement is also technically indoors, but it has so many windows that hiding in it is nearly impossible.
Soldiers, Demomen, and Scouts can use the battlements as a point of ingress either by rocket jumping or double jumping onto the battlements from the bridge's roof.
The battlementsAtop the battlement The Intelligence Room
The intelligence room is hidden well inside the base and has two access points. The first is the courtyard area that connects the foyer and the large room next to the spawn point. The other is through the large room next to the spawn point. Both paths wind around and down before entering the antechamber to the intelligence room. This antechamber has a health ammo pickup on the side closer to the large room entrance, and a defender-exclusive resupply closet on the side closer to the courtyard entrance.
Two elbowed corridors connect the antechamber to the intelligence room, a big rectangular room with a floating briefcase on a desk. If you make it here without dying, it is highly recommended that you pick up this case and get the hell back to your intelligence room to score a point.
The intel antechamberCourtyard staircase down to the intel roomThe courtyard
Log in to comment