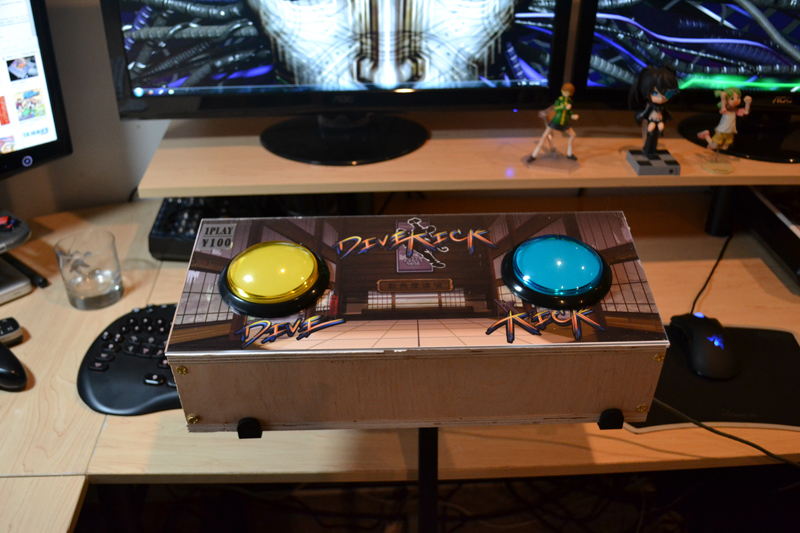
I made my own controller.

  • 61 results
  • 1
  • 2
Avatar image for amafi
amafi

1502

Forum Posts

2

Wiki Points

0

Followers

Reviews: 0

User Lists: 8

WOOO! Took it's sweet time getting here, but I finally got my buttons. Now I just have to learn how to solder and give the box a last coat of paint. And finalize my art, print it and get the plexiglass for the top of the thing cut and mounted. GETTING THERE!

No Caption Provided

Avatar image for dertek
dertek

7

Forum Posts

7

Wiki Points

0

Followers

Reviews: 0

User Lists: 0

Just finished putting together a pair of kickboxes the other day.

No Caption Provided

Avatar image for rongalaxy
RonGalaxy

4937

Forum Posts

48

Wiki Points

0

Followers

Reviews: 1

User Lists: 1

Wait a minute, divekick ain't on 360...LIAR, YOU JUST GLUED SOME BUTTONS TO YOUR SHOES

Avatar image for ghost_cat
ghost_cat

2840

Forum Posts

0

Wiki Points

0

Followers

Reviews: 0

User Lists: 0

So where can I buy this? Better yet, will you release directions or a schematic in the future (I'm no engineer)?

Avatar image for chiablo
chiablo

1052

Forum Posts

41

Wiki Points

0

Followers

Reviews: 0

User Lists: 1

So where can I buy this? Better yet, will you release directions or a schematic in the future (I'm no engineer)?

If you're looking for a super simple (and cheap) way to do this on the PC, get yourself a Teensy microcontroller and a protoboard in addition to the buttons you want to use. The Teensy is a very small version of an Arduino. The benefit of this guy is that you can have it emulate a USB joystick. If you're interested, I can write up the code, it'd only be about a dozen lines; very simple.

This is the microcontroller I use for my NES/SNES adapter for the PC.

For XBox 360 or PS3:

Crack open an old controller and find the button pads you want to use. You will solder the big button directly to them. You do have to sacrifice a controller to do this.

Avatar image for amafi
amafi

1502

Forum Posts

2

Wiki Points

0

Followers

Reviews: 0

User Lists: 8

#57  Edited By amafi

@chiablo: After actually spending 2 minutes looking at how easy the teensy is to program to do USB stuff I ordered two, one teensy 2.0 and a teensy 2.0 pins and a breadboard. Looks no harder than just padhacking.

Also got a second pair of buttons I didn't even know I had ordered, so I guess I'm making a second one.

Avatar image for squidc00kie
squiDc00kiE

475

Forum Posts

188

Wiki Points

0

Followers

Reviews: 0

User Lists: 0

haha awesome

Avatar image for chiablo
chiablo

1052

Forum Posts

41

Wiki Points

0

Followers

Reviews: 0

User Lists: 1

@amafi said:

@chiablo: After actually spending 2 minutes looking at how easy the teensy is to program to do USB stuff I ordered two, one teensy 2.0 and a teensy 2.0 pins and a breadboard. Looks no harder than just padhacking.

Also got a second pair of buttons I didn't even know I had ordered, so I guess I'm making a second one.

The only thing tricky you have to do is in the Arduino IDE, you need to tell the Teensy that it is a USB Joystick. Here's their example page: http://www.pjrc.com/teensy/td_joystick.html

Avatar image for amafi
amafi

1502

Forum Posts

2

Wiki Points

0

Followers

Reviews: 0

User Lists: 8

#60  Edited By amafi

@chiablo said:

@amafi said:

@chiablo: After actually spending 2 minutes looking at how easy the teensy is to program to do USB stuff I ordered two, one teensy 2.0 and a teensy 2.0 pins and a breadboard. Looks no harder than just padhacking.

Also got a second pair of buttons I didn't even know I had ordered, so I guess I'm making a second one.

The only thing tricky you have to do is in the Arduino IDE, you need to tell the Teensy that it is a USB Joystick. Here's their example page: http://www.pjrc.com/teensy/td_joystick.html

I've fallen all the way down the arduino hole now, I fear :(

Cancelled one of my teensy 2 orders, getting teensy 3 and a nice extension cable that lets me mount a usb B cable to the outside of my box, less chance of tuggin on the cable knocking solder loose etc.

Also bought an arduino starter kit and some books. Damn Dave Lang, Keits, and their stupid game. $10 my behind, this just got expensive.

Avatar image for chiablo
chiablo

1052

Forum Posts

41

Wiki Points

0

Followers

Reviews: 0

User Lists: 1

@amafi said:

@chiablo said:

@amafi said:

@chiablo: After actually spending 2 minutes looking at how easy the teensy is to program to do USB stuff I ordered two, one teensy 2.0 and a teensy 2.0 pins and a breadboard. Looks no harder than just padhacking.

Also got a second pair of buttons I didn't even know I had ordered, so I guess I'm making a second one.

The only thing tricky you have to do is in the Arduino IDE, you need to tell the Teensy that it is a USB Joystick. Here's their example page: http://www.pjrc.com/teensy/td_joystick.html

I've fallen all the way down the arduino hole now, I fear :(

Cancelled one of my teensy 2 orders, getting teensy 3 and a nice extension cable that lets me mount a usb B cable to the outside of my box, less chance of tuggin on the cable knocking solder loose etc.

Also bought an arduino starter kit and some books. Damn Dave Lang, Keits, and their stupid game. $10 my behind, this just got expensive.

I work for the company that makes XBees, if you need wireless help, shoot me a PM.

Avatar image for amafi
amafi

1502

Forum Posts

2

Wiki Points

0

Followers

Reviews: 0

User Lists: 8

#62  Edited By amafi

@chiablo said:

@amafi said:

@chiablo said:

@amafi said:

@chiablo: After actually spending 2 minutes looking at how easy the teensy is to program to do USB stuff I ordered two, one teensy 2.0 and a teensy 2.0 pins and a breadboard. Looks no harder than just padhacking.

Also got a second pair of buttons I didn't even know I had ordered, so I guess I'm making a second one.

The only thing tricky you have to do is in the Arduino IDE, you need to tell the Teensy that it is a USB Joystick. Here's their example page: http://www.pjrc.com/teensy/td_joystick.html

I've fallen all the way down the arduino hole now, I fear :(

Cancelled one of my teensy 2 orders, getting teensy 3 and a nice extension cable that lets me mount a usb B cable to the outside of my box, less chance of tuggin on the cable knocking solder loose etc.

Also bought an arduino starter kit and some books. Damn Dave Lang, Keits, and their stupid game. $10 my behind, this just got expensive.

I work for the company that makes XBees, if you need wireless help, shoot me a PM.

I'll probably take you up on that at some point. I basically got nothing done at work today, I was just looking up various arduino boards and thinking about stuff I could do with them, and some of them would be incredibly cool to do wirelessly.

Avatar image for chiablo
chiablo

1052

Forum Posts

41

Wiki Points

0

Followers

Reviews: 0

User Lists: 1

@amafi said:

@chiablo said:

@amafi said:

@chiablo said:

@amafi said:

@chiablo: After actually spending 2 minutes looking at how easy the teensy is to program to do USB stuff I ordered two, one teensy 2.0 and a teensy 2.0 pins and a breadboard. Looks no harder than just padhacking.

Also got a second pair of buttons I didn't even know I had ordered, so I guess I'm making a second one.

The only thing tricky you have to do is in the Arduino IDE, you need to tell the Teensy that it is a USB Joystick. Here's their example page: http://www.pjrc.com/teensy/td_joystick.html

I've fallen all the way down the arduino hole now, I fear :(

Cancelled one of my teensy 2 orders, getting teensy 3 and a nice extension cable that lets me mount a usb B cable to the outside of my box, less chance of tuggin on the cable knocking solder loose etc.

Also bought an arduino starter kit and some books. Damn Dave Lang, Keits, and their stupid game. $10 my behind, this just got expensive.

I work for the company that makes XBees, if you need wireless help, shoot me a PM.

I'll probably take you up on that at some point. I basically got nothing done at work today, I was just looking up various arduino boards and thinking about stuff I could do with them, and some of them would be incredibly cool to do wirelessly.

If you want to do wireless for two buttons very easily, get two Series 1 (802.15.4) Xbees and a Sparkfun USB Explorer board (or something similar). I can generate profiles for you that will do I/O Line Passing.

Avatar image for amafi
amafi

1502

Forum Posts

2

Wiki Points

0

Followers

Reviews: 0

User Lists: 8

I'm the biggest idiot. Wired my stuff up on the protoboard. Then I figured out that wiring with pullup resistors is the way to do it. Did that, did a debug with serial output and noticed a lot of chatter. Sat around messing with my code for a good bit adding a delay to the update to get rid of the chatter. After 3 hours or so of that I decided to spend 3 minutes googling, which brought me back to the teensy site and the Bounce library. Then I noticed I actually had the library and example files for it in my arduino folder already. Lesson learned. Google, THEN code. Now I just need to get the soldering done and mount the buttons and hope it still works.